
tank blog
As promised three weeks ago (yikes!), here is the writeup on my new booster LED for my Kessil.
I really like the color on my Kessil A360WE, but it is missing that low-end pop from the low 400nm spectrum of light. I’m not about to change my light to something else, so I went about a little DIY project. One of the reasons I chose the Kessil in the first place is the sleek design, so my approach has to keep the clean lines and needs to blend in (as much as possible) with the current look. I’m happy with the results and here are the details for how I did it. First a bit of background...
Background
The Kessil A360 throws off a ton of light and it does so in a very important band of the spectrum. The peak you see in Figure 1 lines up pretty closely with the peak absorption point for Chlorophyll b and the first of two major points of absorption for the Carotenoids (Figure 2). These two combined make up for around half of the total light absorbing pigments in our corals and this is where photosynthetic zooxanthella gather food for their host coral.
Figure 1: Kessil A360WE Light Spectrum
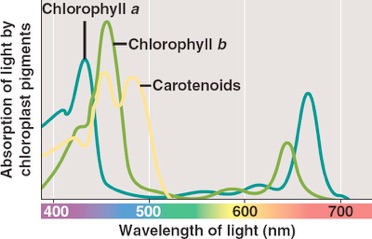
Figure 2: Chloroplast Absorption Spectrum
Can you see what’s missing? There’s almost nothing there for the Chlorophyll a spectrum! This also happens to be the spectrum of light that people call “pop”. When you see corals glow in a tank, it is from light in this spectrum that does it. So I needed to find an LED add-on that would give me a punch in the 430nm wavelength to boost the Chlorophyll a pigments. When you account for the Chlorophyll a, b and Carotenoids you cover more than 80% of the total pigments in the coral. That’s a lot of food for your corals to get energy from. Now that you know why this is needed, let’s talk about what I actually made.
Equipment:
LEDGroupbuy 3UP Hypverviolt (430nm) LED ($9)
LEDGroupbuy 3UP XT-E 40 Degree Lens ($1.50)
Meanwell LDD-500HW LED Driver ($7.50)
12VDC Switching Power Adapter ($5)
Aluminum Flat Bar ($6)
Total Cost: $23
Mounting:
As we all know, LEDs are much more efficient than their fluorescent and metal halide brethren. Just because they are more efficient, it doesn’t mean that are actually efficient. In fact, LEDs are between 60-90% efficient (depending on the LED). That 10-40% loss is heat and you need to get the heat away from the LED or you will drastically shorten its life. Lucky for me, three LEDs running at 500mA doesn’t generate all that much heat to dissipate. It is low enough that I can do it passively (aka without a fan). My Kessil is mounted in a great light mount and I want to leverage that same mount for the new LED so it blends into the light.
What I came up with is very simple and you can make it yourself with tools most of us have laying around. I did cut a piece off of the larger aluminum bar stock to make this using my Dremel. I’m sure you know someone with one who can help you out. The bends I made using a hammer and a vice. Just clamp, bend and smack it with the hammer to make it 90 degrees. There’s a hole for the mounting screw, one for the wiring to come through the LED star board and one in the corner for the wiring to come through. Super easy, just one cut, two bends and three holes.

Figure 3: Mounting Bracket
The LED is held on using thermal adhesive. You can find this stuff at some electronics stores, but it is getting harder to come by. You can order it from Amazon and it is only a few bucks. It is critical that you use a thermal adhesive or the heat from the LED won’t transfer to the aluminum bar for heat dissipation. I also found these little heatsinks that are made for GPUs and decided, “What the heck, I’ll add one.” I don’t think it is necessary, but it can’t hurt. You can see the heat sink in the picture at the top of the post.
And here’s how it came out...
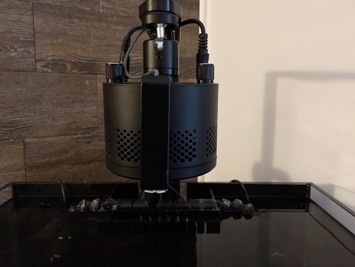
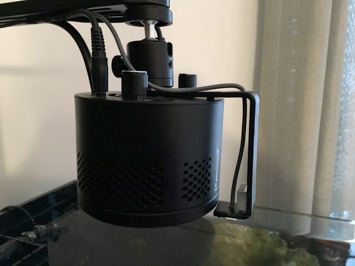
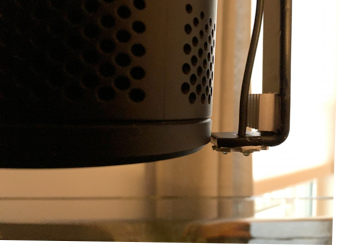
Figure 4.(a/b): (a) Front and (b) Side View of the Mounted LED
It may not be perfect, but I’m really happy with the result. The spray paint I chose is the same matte black as the Kessil and the LED sits just at the bottom of the Kessil’s frame. The grey wire coming up carries power down to the LED and also connects to the daisy chain output of the Kessil. Then all of the wires run down to the driver behind the tank. More on that in the wiring section....
Wiring:
I went with a readily available and inexpensive driver from Meanwell for this project, the LDD-500HW. It’s super simple, just give it DC power and plug it into the LED. DONE! It gives you the option of dimming the LED too. Turns out this driver uses a 5VDC PWM signal and not the 0-10VDC analog signal my Kessil has. My bad, but more on that later.
Like I said, the wiring is really simple. You provide a DC input (12VDC in my case) to the red and black wires and connect the blue and yellow wires to your LED. You can stop there and everything would work just fine or you can use the white wire for a dimming signal.

Figure 5: LDD-500HW Wiring
One of the things I don’t like about the Kessil is that you can only dim it down to 13% and then it abruptly shuts off. Most drivers out there will let you dim down to 5% and I’ve built a fixture that would dim down to 1%. Having this extra LED means I can dim the tank lights much more gradually from off to on and vice versa. I’m already controlling the Kessil using my Reef Angel, so it would be great to just use that same signal to dim this LED as well.
If you look at Figure 4.b you can see I’m using the daisy chain output of the Kessil. That’s wired into the grey wire that runs down to my driver behind the tank. The idea is that I just use the same dimming signal for intensity from the Kessil for the add on LED. So I wired this all up, plugged it in ANNNDDDD.... nothing. The LED went off. I quickly unplugged it and immediately thought two things:
Crap, I just killed this driver....
Double crap, I bought the wrong driver.
“Lucky” for me, it was the latter issue and I didn’t fry anything. This driver uses a 5VDC PWM signal for control and the Kessil uses a 0-10VDC analog signal. DANG IT! So for now my little LED just runs at 500mA. It is rated to 750mA and I intentionally bought a lower powered driver as a safety.
Result:
I tried taking some pictures with the LED on and off and it is really hard to capture the difference. I’m going to keep trying though. In the meanwhile, here’s a blown out shot of it taken with my phone. It is NOT this pink in real life.
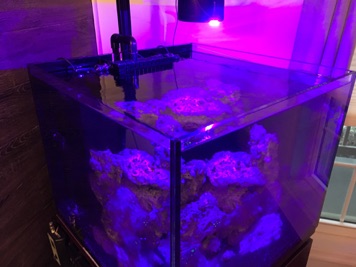
Figure 6: It Works! (It isn’t really that color)
I will say that without a doubt there is a big difference in the appearance of the corals. They all pop and glow much more than they did before. This LED puts out a lot of PAR and the corals all start to open when it comes on in the morning. It comes on 30 minutes before the Kessil does. I’m very happy with the results and for under $30 it is one of the best DIY bangs for the buck I’ve done in a long while.

Friday, March 4, 2016
a little more pop
430nm boost


